Friday, June 12, 2009
New iGoogle For Android! + Screenshots!
Via : Official Google Blog
"This new version is faster and easier to use. It supports tabs as well as more of your favorite gadgets, including those built by third-party developers. Note that not all gadgets — like those with Flash — will work in mobile browsers.
One of our favorite new features is the in-line display of articles for feed-based gadgets. That means you can read article summaries without leaving the page. You can also rearrange gadget order or keep your favorite gadgets open for your next visit. None of these changes will mess up the layout of gadgets on your desktop computer, so feel free to play around and tune your mobile experience.
The new version of iGoogle for mobile is available in 38 languages. To try it out, go to igoogle.com in your mobile browser and tap "Try the new Mobile iGoogle". Bookmark the page or make it your home page so you can return to it quickly. Finally, please fill out our survey by clicking on the "Tell us what you think" link at the top of the new home page. We'll continue to use your feedback to make iGoogle even better."
Turn Your Android Phone into a SIP Phone Place/Recieve Free Calls with Google Voice or Use other voip Service.
Did you know you can turn your phone into a SIP phone with sipDroid?
I have added my Gizmoproject phone number to my GoogleVoice account, GoogleVoice is currently private beta without invites, so you may want to try ipKall or another cheap voip/sip service.
The nice thing with this setup is it allows you to either use your unlimited data plan or wifi connection to make/recieve calls.
First you need to login to gizmoproject.com or create an account then find the SIP phone number to add to GoogleVoice:
SipDroid only works with cupcake/adp roms
Run SipDroid
Press Menu->Settings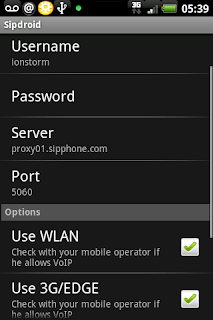 :
:
Press Server, and enter: proxy01.sipphone.com
Then enter your Gizmo login information where Username/Password are
Press Use WLAN, and Use 3g/Edge and leave the other settings alone, press back then you are ready to use Google Voice to place all call :)
Head over to https://www.google.com/voice/m/phones
Make sure gizmo is checked, then go to http://www.google.com/voice/m and input a number in quick call and press call.
Enjoy your free Sip calls without using airtime over 3g or wifi :)
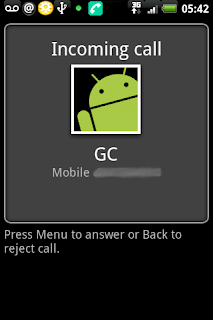
Example Incoming SIP Call:
Sipdroid is an open-source SIP client implemented in Java. The project was based on:
- Mjsip contributing the original stack,
- initial port to Android emulator and development of a Test SIP Client by Hughes Systique Corporation.
I have added my Gizmoproject phone number to my GoogleVoice account, GoogleVoice is currently private beta without invites, so you may want to try ipKall or another cheap voip/sip service.
The nice thing with this setup is it allows you to either use your unlimited data plan or wifi connection to make/recieve calls.
First you need to login to gizmoproject.com or create an account then find the SIP phone number to add to GoogleVoice:
- Sign in to Google Voice.
- Go to the Settings link at the top right of the page.
- Click the Add/Edit Number link right above your phones, to the right of the page.
- Click the Phones tab.
- Click Add a new number.
- Select Gizmo in the Phone Type drop-down menu.
- Enter your SIP number without 1.
- Enter a name for that phone, if you want.
- Click Save.
SipDroid only works with cupcake/adp roms
Run SipDroid
Press Menu->Settings
 :
:Press Server, and enter: proxy01.sipphone.com
Then enter your Gizmo login information where Username/Password are
Press Use WLAN, and Use 3g/Edge and leave the other settings alone, press back then you are ready to use Google Voice to place all call :)
Head over to https://www.google.com/voice/m/phones
Make sure gizmo is checked, then go to http://www.google.com/voice/m and input a number in quick call and press call.
Enjoy your free Sip calls without using airtime over 3g or wifi :)
Example Incoming SIP Call:

GlossSuite G1 Theme
GlossSuite
Here is another Great theme for your Android G1
DOWNLOAD:
WITH custom lock screen
WITHOUT custom lock screen(updated March 31st)
Previous Versions:
Original Status Icons
You must have a rooted phone with a modified recovery img
Install by downloading the theme to /sdcard/update.zip
Reboot into Recovery with Home + Power and ALT+S to apply
Currently works with JF RC33, and possibly Dudes, and Cyanogen's
Developer: MoonSpoon
Howto Upgrade your Android G1 to the Latest Radio & SPL
First you need to update your radio to the latest before applying this spl to avoid bricking your device. You also must flash one of the newer roms that support the new radio/spl which are dudes, cyanogens, or any hero rom.
This SPL is optional and optimized for hero and rogers roms, if you flash the spl make sure you have a nandroid backup or rom to reflash because you will need to do so.
The latest Radio version is 2.22.19.26I with a Baseband Version of 62.50S.20.17H_2.22.19.26I
Download the radio to /sdcard/update and download the SPL here to /sdcard/spl-signed.zip
Shutdown your phone and press Home + Power while booting to get to the recovery console, then press ALT-S to flash, once its finished and done rebooting twice, go back into the recovery console.
Press ALT+X for terminal, press Enter, then type:
Press ALT+S to flash the new SPL after your successfully flashed the new Radio!
This SPL is optional and optimized for hero and rogers roms, if you flash the spl make sure you have a nandroid backup or rom to reflash because you will need to do so.
The latest Radio version is 2.22.19.26I with a Baseband Version of 62.50S.20.17H_2.22.19.26I
Download the radio to /sdcard/update and download the SPL here to /sdcard/spl-signed.zip
Shutdown your phone and press Home + Power while booting to get to the recovery console, then press ALT-S to flash, once its finished and done rebooting twice, go back into the recovery console.
Press ALT+X for terminal, press Enter, then type:
mount /sdcard
cd /sdcard
mv update.zip latestradio.zip
mv spl-signed.zip update.zip
cd ..
umount /sdcard
recovery #Sends you back to the recovery screen
Press ALT+S to flash the new SPL after your successfully flashed the new Radio!
JACMan 1.62 Modified Hero ROM
There has been allot of HTC Hero Rom modifications, this seems like it could be one of the best, one i'll definitely be flashing this baby soon.
You must install the latest Radio & Spl for this build: instructions here
Manup and Justanotherdev put alot of hard work into this (modified .xmls drawables and alot under the hood, not just moving files around) so credit us if you use our work!!!! ! And don't rip Manup456 or Justanotherdev off. Pay some respect and contact them first.
Changelog:
JACMan Hero r1.62
Changes in 1.62
1.62 is just adding back Youtube, PDF Reader, QuickOffice and Mail.apk that 1.61 was missing.
All widgets except weather. (I'm looking into why the weather widgets are having a fit) Load them from the resources if you want them. APPS2SD.apk put back in so you can use it like in 1.4. All other changes from 1.6 remain.
Changes in r1.61
outube, PDF Reader, QuickOffice and Mail.apk were removed and weather widget/app was added.Reverted to SYMLINK method for APPS2SD
Changes in r1.6
-Minor changes to the 2.6.29 Kernel
-UnionFS support but we are still going to symlink for now
-Manup456'smodified xml's drawables and graphic and .apks
-All widgets put back into /data/app_S
-modified trigger support
-Modified RAMDISK with noatime, nodirtime, EXT/EXT3 mount support
-Sensor Hardware and LED Light .so updates (still not functioning ATM)
-BT permissions fix for the Dbus "chmod 666 /dev/socket/dbus/" (a step forward BT still not working)
-Fix permissions on /data/app in update-script
-Fixed Browser downloads issue
-Fixed Flash Player issue
***NOTE***APPS2SD requires a class 6 card, class 4 (4GB cards are the worst!!!)cards have been reported more issues with slowness than anyone even those with class 2 cards.
Hero r1.5 Fully Optimized
This should not have been uploaded. APPS2SD via unionFS is broken and can't be fixed in this update, not with any easy method anyway. I've had people report it runs great, if it does that is awesome but just understand APPS2SD support via union will not work. You could go ahead and symlink everything as they wont be broken on reboot on this particular build.
Hero r1.4 Fully Optimized
-Ion Dalvik VM
-Marcus APPS2SD1 (symlink) included out of the box
-BusyBox Included
-Phone.apk fixed
-Dexopt-Wrapper Included
-Fully Optimized out of the box (.Odex'd)
-Superuser.Apk Included
-com.android.term.Apk Included (Terminal App)
-HTC IME instead of HTC CIME
-Rosie.apk and core files for a stable/fast build reside on internal memory even after APPS2SD!!!
-Data/System partition optimized
-PSCII.apk removed
Wipe Recommended
First things First!!!!
For r1.61 we are sticking with SYMLINKS for now. I put Marcus's APPS2SD.apk back in. As soon as I figure out something better that will work...easily for people you will have it. So think of this as a direct upgrade from 1.4...the unionFS support is there but isn't being used.
For r1.4 YOU NEED TO GO TO TERMINAL SU THEN "chown system.system /data/app" before you can download from the market!!!! For VK enable under Settings>Locale and Text and Reboot. Also you might as well disable auto backlight it does not work and will not work.
JACMan r1.61 SYMLINK APPS2SD - MD5:F7A5B6E9F74A2E7AEFC0A304B81CDB31
http://www.slackdev.com/justanotherdev/
r1.4 IS SYMLINK APPS2SD BUILD - MD5:3857F96C6503AE1CE1F54E5B98BD78C2
http://www.slackdev.com/justanotherdev/
Widget's/Weather.apk/Hero Audio Resources available here:
Primary Download Site
Step 1 - Install
Mount your SD card on your current ROM
Copy update.zip to the Root of you SD
Power Off the phone
Power on via Recovery Console(Home+Power)
Apply a Wipe - Alt+W
Apply Update - Alt+S
Reboot - Home+Back
Step 2 - APPS2SD: Part 1 Check for a mounted EXT2 SD card partition
If you haven't partitioned your SD card you need stop here and get that completed. Open Terminal and make sure your EXT2 partition is mounted by typing "df" or "mount". You should see you SD card mounted under /system/sd with the its appropriate attributes.
Step 2 - APPS2SD: Part 2 Run APPS2SD
Launch the included APPS2SD or download it from Marcus's tutorial for 1.6 to move apps to a EXT2 partition on your SD card. You wont get any message that its done just wait about 5 minutes and reboot. (you may see some force closes dont worry)
Step 2 - APPS2SD
Configure you SDcard per Marcus's APPS2SD tutorial and boot,use the included .apk to move everything just like 1.4
Step - 3 Enjoy!
Enjoy a COMPLETE fully optimized Hero build that runs plenty smooth for daily use
NOTE - This ROM can be run with or without APPS2SD.
Known Bugs/Issues With ALL Hero Builds(These will be looked at later):
Reboot not permited from terminal.
LED notifications not working.
Home Screen & Lock Screen wallpapers can not be set from gallery.
HTC widget for photo album and photo frame force closes.
No landscape view of home when keyboard is open.
Attach MMS force close
Tip from "buttkicker" to switch between Rosie and the Regular Launcher.apk. No Rosie UI Switcher needed[b]
Just do this on your phone.
- Go to "Settings >> Applications >> Manage applications"
- Scroll and click on "Rosie".
- Click on "Clear defaults"
- Press the home button
- Check the box for "Use by default for this action"
- Select "Home"
If you like this work visit JustanotherDev on Twitter.
JACked Hero - Modified SuperHero with JACHero and Twisted Modifications Version 1 & 2
This is a revamped version of JACHero, which means it'll just barely work
This is a version of SuperHero with JACHero and Twisted Modifications
Added VoiceSearch and VoiceDial
Redesigned the app / app_s structure
Other random stuff I can't remember
Used the modified .29 boot from cyanogen for aufs with the unionfs.ko
You must use the modified haykuro spl: Download
Download:
Version 1:http://www.megaupload.com/?d=OCNCAPMH
Version 2: http://www.megaupload.com/?d=D2JZFPW8
Follow the Developer:
http://twitter.com/TwistedUmbrella
http://code.google.com/p/cupcake-frosting/
The Dudes Cupcake 1.3 RC1 Released
The Dude Of Life just released a new rom with the following fixes:
Click Here to download
- Switched to cyanogens boot for improved kernel/aufs apps2sd method (till i get my kernel worked out with aufs
)
- Modified a2sd script to mount auto but not automatically convert to ext3
- upgrade_fs binary to convert ext2 to ext3
- fix_permissions script from cyanogen
- New a2sd script from marcus/cyanogen that fixes permissions and doesn't have any issues with installing applications, lack of free space.
- Louderv5 from Meltus once he releases it.
- Updated libhtc_ril (from hero, should make latitude happy)
- hero port theme with green status bars and hero animations
(no rosie)
- Waiting for new services.jar update with headphone fix...
- Moved 3rd party apps / dev apps to separate update.
- Added Wiftether 1.51 from http://code.google.com/p/android-wifi-tether/
- created odex files and removed classes.dex from system apps (won't fit on original spl...working on it..)For a full overview of his rom checkout my review here included all the changes and screenshots!
Click Here to download
Thursday, June 11, 2009
Introducing GV - Google Voice App For Android!
I have been a Google GrandCentral user for over a year, and a few months back Google Voice was released! Before Google Voice was even released Evan Charlton an Android Developer that created successful android apps like FML, Mileage, and G1 Central released GV to the Android Market!
GV is an Android front-end to the Google Voice service.
This application is free and source is available under the Apache 2.0 license.
- Easily configured to route all calls from your Android device through Google Voice.
- Or selectively dial contacts (or ad-hoc numbers).
- Use visual voicemail to listen to, download, delete, or reply to your voicemail messages.
- Send SMS messages from your Google Voice number, and receive the(free SMS!)
- Browse your call log (placed/missed/received calls) in a visual way.
- View Voicemail Transcripts on the Fly before listening to the actual message
- Full SMS support (conversations, replying, much better composition view, etc).
- Faster loading
- Recursive loading of voicemail, call logs, SMS
- Delete call log entries
- Restored callback dialing. Due to user feedback, I revamped and restored the callback method of initiating a call. This works when calling from GV as well as when GV is set to route all calls through Google Voice.
Added some nice auto-text features on the SMS composition text area and fixed a bug with the unread-checker service (caused when the net connection couldn't find google.com)
Search for "GV" in the market or click here from your Android Device to me directed to the market!
Follow GV Development Here
Cyrket.com - Android Market Browser for your Desktop/Laptop or Netbook!
Cyrket.com is a nice site that allows you to browse the android market while on your desktop pc, laptop, and netbook. Some of the features I love is that it is easy to search , QR-Codes, app ratings and recent reviews! My favorite is the QR-Code capability, you can simply find an app on Cryket, open the barcode scanner app found in the market on your android device and point it to the QR-Code and your android device will be directed right to the app you found at your desk. Its great for work and to impress friends :) You can even keep up with the latest apps with your favorite RSS reader!
Checkout Cyrket.com
Checkout Cyrket.com
Introducing Twidgit, The First and Best Twitter Widget for Android!
Its only been a few weeks since cupcake has been released to everyone and Twidgit The very first Twitter widget appeared in the market by a talented 22 year old named Matt Woodfield
Twidgit is A Twitter homescreen widget that updates with your most recent timeline feed,
views the last 20 tweets, allows you to reply to each & set your status in an instant without having a resource intensive app running that slows down your G1
Twidgit Already has great potential to beat the top twitter apps on the market like Twitdroid, Twit2go, and a few others.
It looks like Twidgit 1.1.6 was removed off the market anticipating a new 1.1.7 release!
Matt just posted this announcement on Twitter!
Here is 1.1.6 if you want to check it out, download like any other app within your G1 browser and install, and longpress your homescreen->Widget->Twidgit Lite
IMPORTANT If updating, please remove existing widget from home screen before install
[EDIT] Lite 1.1.7 released to the android market. Update includes text correction, char counter & tweet timestamps. More coming soon…
Click Here From your Android Device to Download
More info Here
Follow the Developer on Twitter
Tweak Android for Performance, and increase battery by Saving Power Usage with Sysctl!
For the last couple of days I have been looking at the android os and am trying to find a few ways to optimize performance and increase battery life on the G1. I have found a few sysctl commands that you can expiriment with and let me know the results.
When echoing in the following sysctl settings they do not remain after reboot, so we can adb remount then create a sysctl.conf file on our pc's with these settings, then ./adb push sysctl.conf /etc/ then the kernel should apply the settings every reboot
For examples of a sysctl.conf use google: Sysctl.conf Examples
Open a Terminal and Execute these commands as root
Tweak virtual memory to conserve power when running on battery:
Tweak virtual memory for running on Charger:
Detecting apps/services that hog the battery/cpu:
Also while on battery, you should stop all applications that don't really stay idle when you're not using them, if you want to find which apps arent really staying idle you can:
Additional Tweaks:
By default when Linux runs out of memory it goes through the process list and starts killing off processes that it thinks are using too much memory. This sysctl makes Linux kill the runaway process that made the system run out of memory instead, which is usually what you want.(this will also reduce cpu time and increase battery usage).
vfs_cache_pressure to 10 , gives more mem to cache fs dentry and inode to save cpu
At the default value of vfs_cache_pressure = 100 the kernel will attempt to reclaim dentries and inodes at a "fair" rate with respect to pagecache and swapcache reclaim. Decreasing vfs_cache_pressure causes the kernel to prefer to retain dentry and inode caches. Increasing vfs_cache_pressure beyond 100 causes the kernel to prefer to reclaim dentries and inodes.
You may also try setting this to 200 and see if you notice a difference with battery life and app startup times.
There is an in depth discussion over these tweaks over at XDA, feel free to join in if you have any comments or suggestions Here
When echoing in the following sysctl settings they do not remain after reboot, so we can adb remount then create a sysctl.conf file on our pc's with these settings, then ./adb push sysctl.conf /etc/ then the kernel should apply the settings every reboot
For examples of a sysctl.conf use google: Sysctl.conf Examples
Open a Terminal and Execute these commands as root
Tweak virtual memory to conserve power when running on battery:
echo 0 > /proc/sys/vm/swappiness #can be ignored if you dont use swap
echo 0 > /proc/sys/vm/dirty_expire_centisecs #can be ignored if you dont use swap
echo 0 > /proc/sys/vm/dirty_writeback_centisecs #can be ignored if you dont use swap
echo 60 > /proc/sys/vm/dirty_background_ratio
echo 95 > /proc/sys/vm/dirty_ratio
Tweak virtual memory for running on Charger:
echo 0 > /proc/sys/vm/swappiness #can be ignored if you dont use swap
echo 3000 > /proc/sys/vm/dirty_expire_centisecs #can be ignored if you dont use swap
echo 500  > /proc/sys/vm/dirty_writeback_centisecs #can be ignored if you dont use swap
echo 10   > /proc/sys/vm/dirty_background_ratio
echo 40   > /proc/sys/vm/dirty_ratio
Detecting apps/services that hog the battery/cpu:
Also while on battery, you should stop all applications that don't really stay idle when you're not using them, if you want to find which apps arent really staying idle you can:
strace -p $(pidof yourapp) # for all your running applications
ps aux | awk '{print$10,$11}' | sort -n # will list all running softs sorted by used cpu time
Additional Tweaks:
By default when Linux runs out of memory it goes through the process list and starts killing off processes that it thinks are using too much memory. This sysctl makes Linux kill the runaway process that made the system run out of memory instead, which is usually what you want.(this will also reduce cpu time and increase battery usage).
sysctl -w vm.oom_kill_allocating_task=1vfs_cache_pressure to 10 , gives more mem to cache fs dentry and inode to save cpu
At the default value of vfs_cache_pressure = 100 the kernel will attempt to reclaim dentries and inodes at a "fair" rate with respect to pagecache and swapcache reclaim. Decreasing vfs_cache_pressure causes the kernel to prefer to retain dentry and inode caches. Increasing vfs_cache_pressure beyond 100 causes the kernel to prefer to reclaim dentries and inodes.
sysctl -w vm.vfs_cache_pressure=10You may also try setting this to 200 and see if you notice a difference with battery life and app startup times.
There is an in depth discussion over these tweaks over at XDA, feel free to join in if you have any comments or suggestions Here
HTC Hero Theme 1.2 For the Android G1
New HTC Hero 1.2 Theme
This theme has got to be in my top 5 all time favs in the theme category for the android phone. Reasons being, its complete, well thought out, and almost an exact replica of the hero rom, all accept the Rosie UI. My favorite addition is the 5 home screens :)
Ahhh so this theme looks hot huh? Honestly its nothing compared to the Hero Rom with Rosie UI, if you want to take the risk of flashing the rom and feel like you want to live on androids bleeding edge, check out the SuperHero Rom Here
Special Features:
Download:
Official Releases
HTC Hero v1.2 (5.78MB) [Rapidshare] | [4shared]
HTC Hero v1.1 (5.69MB) [Rapidshare] | [4shared]
HTC Hero v1.0 (5.64MB) [Rapidshare] | [4shared]
Beta Releases
HTC Hero Beta4 (5.66MB) [Rapidshare] | [4shared]
HTC Hero Beta3 (6.03MB) [Rapidshare] | [4shared]
HTC Hero Beta2 (6.00MB) [Rapidshare] | [4shared]
HTC Hero Beta1 (6.14MB) [Rapidshare] | [4shared]
Theme Modifications
2x2 Night Clock Widget (93.5kb) [Rapidshare] | [4shared]
4x3 Night Clock Widget (140kb) [Rapidshare] | [4shared]
4x3 Day Clock Widget (141kb) [Rapidshare] | [4shared]
HTC Hero Sounds [Rapidshare] | [4shared] (extract to sdcard)
Install:(Works with latest DudeOfLife, And Cyanogen Rom's)
Download to /sdcard/update.zip
Enter recovery then ALT-S to install the theme.
Credit: tehseano
This theme has got to be in my top 5 all time favs in the theme category for the android phone. Reasons being, its complete, well thought out, and almost an exact replica of the hero rom, all accept the Rosie UI. My favorite addition is the 5 home screens :)
Ahhh so this theme looks hot huh? Honestly its nothing compared to the Hero Rom with Rosie UI, if you want to take the risk of flashing the rom and feel like you want to live on androids bleeding edge, check out the SuperHero Rom Here
Special Features:
- Multiple Rom Support
- 5 Home Screens
- Auto Rotate on Home Screen
- 5x4 Icon Layout in App Drawer Portrait
- 6x3 Icon Layout in App Drawer Landscape
- Custom Lock Screen
- Hero Transition/Animation Effects
- Hero Analog Clock (4x3)
Download:
Official Releases
HTC Hero v1.2 (5.78MB) [Rapidshare] | [4shared]
HTC Hero v1.1 (5.69MB) [Rapidshare] | [4shared]
HTC Hero v1.0 (5.64MB) [Rapidshare] | [4shared]
Beta Releases
HTC Hero Beta4 (5.66MB) [Rapidshare] | [4shared]
HTC Hero Beta3 (6.03MB) [Rapidshare] | [4shared]
HTC Hero Beta2 (6.00MB) [Rapidshare] | [4shared]
HTC Hero Beta1 (6.14MB) [Rapidshare] | [4shared]
Theme Modifications
2x2 Night Clock Widget (93.5kb) [Rapidshare] | [4shared]
4x3 Night Clock Widget (140kb) [Rapidshare] | [4shared]
4x3 Day Clock Widget (141kb) [Rapidshare] | [4shared]
HTC Hero Sounds [Rapidshare] | [4shared] (extract to sdcard)
Install:(Works with latest DudeOfLife, And Cyanogen Rom's)
Download to /sdcard/update.zip
Enter recovery then ALT-S to install the theme.
Credit: tehseano
Howto: Unroot your Android G1 and get it back to stock factory firmware
When your phone wont boot into the android OS and cannot get to the recovery console, and all you see is the G1 startup screen you basically have one option to try and save your device with this method. Or you may want to get back to stock firmware because your rooted your device and want to send it back where you got it without voiding the warranty.
Save File: G1OrigBootloader_nocheck.zip to /sdcard/update.zip
- Reboot with CALL + MENU + POWER, Hold in HOME + Power to enter recovery, then press ALT+S to Flash
Save File: DREAIMG.nbh to /sdcard/
- Shutdown your G1 Completely, then Hold(camera+power) until you see a bootloader
- Press power to start the update, sit back, relax, wait 30 mins, dont do anything but wait.
- Did you wait long enough? If in doubt keep waiting...
- Press Action(trackball key down) and your phone will reboot
Tether Your Android G1 over Wifi & Bluetooth with the New Tether Wifi for Root Users 1.5.1
Tethering has come along way since the android proxy tethering app, we can now tether over encrypted wep and bluetooth with the new Tether Wifi For Root Users App 1.5.1
This program enables tethering (via wifi and bluetooth) for "rooted" handsets running android (such as the Android DevPhone 1). Clients (your laptop for example) can connect via wifi (ad-hoc mode) or bluetooth and get access to the internet using the 3G, 2G mobile connection or (in case you are using bluetooth) the wifi connection which is established by the handset.
Download
Make sure you have a rooted phone and download this with your browser and install, the configuration is pretty much self explanatory.
FAQ
Screenshots
DudeOfLife's Pimped Out 1.3b11 G1 Cupcake Rom with Hero Theme!
DudeOfLife is by far my favorite rom developer, he has optimized the hell out of Android for the Dream and made it pretty too. This is a classic reason why I love my G1 so much, the ability to enjoy custom compiled roms from the development community with direct feedback from the open-source community.
Recent updates:
- dalvik virtual machine from Ion, and used cyanogens kernel
- Updated weather widget.
- Added code to update script to remove old weatherwidget and data
- Recompiled to andriod 1.5r
- replaced some librarie's and providers
- Added Meltus V2 and Bluetooth Fix
- /data/ partition stuff
- Sms Delivery report's
- Switched to cyanogens boot for improved kernel/aufs apps2sd method (till i get my kernel worked out with aufs )
- Modified a2sd script to mount auto but not automatically convert to ext3
- Created tune2ext3 script that converts your ext2 partition to ext3
- New a2sd script from marcus/cyanogen that fixes permissions and doesn't have any issues with installing applications, lack of free space.
- Louderv4 from Meltus
- Updated libhtc_ril (from hero, should make latitude happy)
- Hero port theme with green status bars and hero animations (no rosie)
- Waiting for new services.jar update with headphone fix...
- Moved 3rd party apps / dev apps to separate update.
- working on a new recovery img that has apps2sd support for pushing data updates to sd card and setting up apps2sd or converting partitons.
- created odex files and removed classes.dex from system apps (won't fit on original spl...working on it..)
- dalvikvm from ION (reported speed increases same as Ion phones)
- Added Amazon mp3 from ION (thanks to disconnect for getting ion out so quickly)
- Added "Louder" AudioPara CSV files by Meltus
- Added IM Application (AIM, Yahoo, MSN)
- Updated Kernel from JF1.51
- added noatime to mount options for ext2 partition
- Updated theme from Manup
- White analog clock from Stericson (Full build only)
- Full time Charging lockscreen from stericson (themed by manup) (full build only)
- Latest a2sd script from marcus (should eliminate no space errors)
- Multitouch browser and kernel
- 5 Home screens w/o custom Home app
- Launcher in portrait mode has 5 x 4 icons
- Launcher in landscape mode has 6x3 icons
- Single update, no more this build or that build.
- MarcusMaximus' Super Easy apps2sd method ready. Just create partition, copy files and smile. or use his app http://www.cyrket.com/package/com.appstosd2
- Tethering works. I suggest anetshrare: http://android.a0soft.com/?url=aNetShare.htm
- Build optimized with JF's build environment.
- Headset button bugfix by lalochz
- Built in theme by manup
- Market works. - Paid, Protected, and Free apps can download/install
- Google Sync (Contacts, Calendar, Gmail) from ADP1.5
- Latest kernel from JesusFreke
- Haykuro's excellent ramdisk with some modifications to allow htc developed apps
- Possible 72 Locales (I'm going to start weeding out the bad ones by 1.0, but I'd prefer to get language packs from you guys )
- Google VK (HTC VK possible to be installed as a 3rd party app)
- Browser Works, zoom etc
- Working Gtalk (No other IMs, but there's an app for that ) (I have the standard IM app if anyone wants to take a crack at making it work)
- Teeter from HTC
- Wifi and Wifi Location Services working
- Calculator
- PDFViewer
- HTC QuickOffice
- Busybox with symlinks to many apps in /system/xbin/bb/
- Superuser / root abilities by zinx
- Email from ADP1.5
- GPS / Location Services enabled
- Camera/Video Recording
- YouTube HQ and Video Uploading
- Terminal emulator from JesusFreke compiling one for you guys soon
Download Dudes 1.3b11 Rom to /sdcard
First upgrade your spl if you already have not:
Download SPL
Rename spl-signed.zip to update.zip
put on root of sd
ALT-W to wipe (optional)
Then ALT-S to flash
Then Reboot to Recovery, press ALT-X then enter to enter terminal
mount /sdcard
cd /sdcard
mv update.zip spl-signed.zip
mv dudes13b8.zip update.zip
cd /
umount /sdcard
recovery
ALT-S to Flash, the first boot is pretty slow so be prepared to wait 20 mins or so.
Rom Developer: DudeOfLife
Cyanogen's Heavily Optimized Android G1 ROM v3.4
Cyanogen is maintaining a custom ROM based on Android 1.5r2 focusing on performance and reliability, with some additional features. Yes, this will work just fine on your non-ADP devices. Cyanogen focuses very hard on making his roms bleeding edge and making his roms use the G1's full hardware potential. He seems to be a linux guru and compiles his own kernel off of the latest cupcake branch 1.5r2. He currently is the most active rom developer at the moment. I personally prefer DudeOfLife's latest rom because of the looks and speed even though cyanogen's may be a few days newer.
Cyanogen's Disclaimer:
While this build is heavily optimized, it is also capable of pushing your G1 much harder. I am not responsible for bricked devices, dead SD cards, thermonuclear war, or the current economic crisis. Please do some research if you have any concerns about features included in this ROM before flashing it!
Features:
Download: update-cm-3.4-signed.zip to /sdcard
MD5Sum: 7b5db59053639eca5180f5a36cf3896c
Reboot into Recovery with Home+Power
Wipe with ALT-W
Flash with ALT-S, and sit back and chillax
Re-Login to Google and enjoy!
Follow Cyanogen on Twitter
Cyanogen's Disclaimer:
While this build is heavily optimized, it is also capable of pushing your G1 much harder. I am not responsible for bricked devices, dead SD cards, thermonuclear war, or the current economic crisis. Please do some research if you have any concerns about features included in this ROM before flashing it!
Features:
- Based on AOSP 1.5r2 with some help from JF-1.51-ADP
- Enhanced ramdisk to mount partitions with noatime/nodiratime (perf boost)
- Includes E2FSProgs for checking and converting Ext filesystems! (3.3)
- Apps2SD via AUFS (same as UnionFS) enabled by default! (3.3)
- Includes script to upgrade to ext3 (from recovery mode, see FAQ)
- Uses Ext3 for Apps2SD
- Includes HTC Framework libraries
- Includes PDFViewer and Teeter
- Includes latest HTC_IME with long-press, calibration, and compact QWERTY.
- Modified Launcher to allow for sensor-based rotation that actually works.
- Sexy pattern-lock from Sapphire
- Added modifications to remount filesystems readonly at shutdown, and fsck at boot (should stop FS corruption)
- Includes T-Mobile IM application and Amazon MP3
- Does not require the "special" SPL
- Optimized kernel (no debug options, cfq iosched) (3.3)
- Includes Haykuro's APN list
- Tweaked frequency scaling options to be more responsive
- Maximum CPU scaling frequency set to 528MHz (3.3)
Download: update-cm-3.4-signed.zip to /sdcard
MD5Sum: 7b5db59053639eca5180f5a36cf3896c
Reboot into Recovery with Home+Power
Wipe with ALT-W
Flash with ALT-S, and sit back and chillax
Re-Login to Google and enjoy!
Follow Cyanogen on Twitter
Android Unleashed is now optimized for your Mobile Experience!
Android-Unleashed.com Is now optimized for your mobile experience at m.android-unleashed.com
Enjoy!
Enjoy!
Wednesday, June 10, 2009
Howto: Change your Boot logo to cute little androids :)

Save File: cutebot.zip
adb remount
adb push boot.gif /system/media
adb push boot.mp3 /system/media
enjoy those little guys :)
This method only works on Hero Roms
Flash the Latest Hero Rom SuperHero v1 Beta 2 Full and Lite Edition to your Android G1!
SuperHero v1 Beta 2 Full and Lite Edition is out!!!
Wow pretty hot huh? If your a bit scared to flash the new Hero Rom on your G1, feel free to get a bit of its look with the HTC Hero Theme 1.2 Found Here
You must have the new spl
Beta 2 Full:
New kernel using noatime, and unionfs
Supports ext2 and ext3 partitions.
Dalvik Vm from Ion build
Clocks and weather working now.
Apps2sd included
terminal,superuser,busybox,setcpu
all widgets were included
all stock fonts, boot screens, and rosie.apk
Beta 2 Lite:
New kernel using noatime, and unionfs
Supports ext2 and ext3 partitions.
Dalvik Vm from Ion build
Clock works now.
(We are working on the weather app We should have a fix soon)
Apps2sd included
terminal,superuser,busybox,setcpu
No widgets were included
all stock fonts, boot screens, and rosie.apk
Instuctions:
First upgrade your spl:
Download SPL
Rename spl-signed.zip to update.zip
put on root of sd
ALT-W to wipe
Then ALT-S to flash
Then Reboot to Recovery
Download Latest Hero ROM (scroll down)
Rename to update.zip
put on root of sd
ALT-W to wipe
Then ALT-S to flash
After it boots use the apps to sd app as this is a must for this build!!!!
then move dalvik cache...reboot
If anyone has problems with market do this in terminal..
su
chown system.system /data/app
More Information at http://herog3.wicholandia.com/news.php
Beta 1 Overview:
Ok just booted it up, signed in to twitter and google, and posted a few screenshots, first impressions, it starts up the first time slow of course, but rosie is more responsive, the font is ok, but may need to be changed.. I am gonna continue testing this and see what else I can share, its definately good enough to play with.
The responsiveness is definitely better, and after I installed the Overclock widget in the market it seemed even better
Restore Original Boot Screen:
I didnt like the new boot screen, so I changed it back to the cute little bots peeking behind the HTC logo, this is how you do it:
Download: http://drop.io/HeroPorts/asset/cutebot-zip
Extract that to anywhere
adb remount
adb push boot.gif /system/media
adb push boot.mp3 /system/media
enjoy those little guys
Restore Original Fonts:
I also didnt care for the fonts much, here is how I reverted back:
Download http://drop.io/HeroPorts/asset/origherofonts-zip and then extract zip
adb remount
adb push fonts /system/fonts/
adb reboot
Download Full Edition: http://herog3.wicholandia.com/request.php?16
Download Lite Edition: http://herog3.wicholandia.com/request.php?17
Credits go to: Diaztradeinc & Jrbourque for creating this new build, follow news and updates:
http://herog3.wicholandia.com/news.php
Howto: Upgrade your Recovery Partition to Cyanogen's 1.2 Pimped Recovery
It is a good idea to update to the newest and latest Recovery Partition for the latest options in flashing our roms, making a backup and accessing your sdcard before your
This recovery image contains:
MD5Sum: 25b4203d7a823e60d394feb910f1a898
To install: copy it to your sdcard open up a terminal or ./adb shell
It is suggested to fully shutdown the device and power it back up.
Check Recovery IMG by rebooting phone and pressing Home + Power to see the new Recovery IMG
Credit: Cyanogen
This recovery image contains:
- E2FSProgs
- FSCK for ext filesystems from the menu
- Move apps to sd from the menu
- Various scripts, upgrade_fs (convert to ext3), fix_permissions (set app and data permissions to what packages.xml expects)
- Kernel from CyanogenMod-3.4
- Nandroid 2.1
- Scroll Ball enabled
MD5Sum: 25b4203d7a823e60d394feb910f1a898
To install: copy it to your sdcard open up a terminal or ./adb shell
su
flash_image recovery /sdcard/cm-recovery-1.2.img
It is suggested to fully shutdown the device and power it back up.
Check Recovery IMG by rebooting phone and pressing Home + Power to see the new Recovery IMG
Credit: Cyanogen
Howto: Upgrade/Update your Android G1 to the Latest HTC Radio
It is suggested to keep your radio on your device up to date because it often gets bug fixes that allow you to get better reception, battery life, and less dropped calls.
Lets update the radio:
First Download the latest Radio Here to your /sdcard
Rename ota-radio-2_22_19_26I.zip to update.zip
Press Home + Power while booting up your device to enter the recovery console
Press ALT-S to update the radio
The device will reboot serveral times, once your are back in the android os, power down the device then boot up!
Howto: Quickly Root your Android G1 Phone in 14 Steps
The first step is to downgrade so you can obtain root access.
- Download the RC29 NBH file if you are in the US or the RC7 NBH file if you are in the UK.
- Place this file on your sd card (it is best if you format the card to FAT32 before this step, if you run into errors try that).
- Turn the device power off and make sure your sd card is inserted.
- Hold down the camera button while you turn on your phone to enter bootloader.
- Press the power button to start flashing the image file.
- After it finishes, press the trackball and perform a soft reset by pressing "Call" + "Menu" + "End" to reboot.
- Once your phone boots to the desktop hit the
key twice and then type "telnetd" and press again. - Download Android Telnet client (ConnectBot, other telnet clients do not seem to work properly when initially gaining root), run it and connect to "localhost". If you are unable to connect, try steps 1 and 2 over again until you can. Also, you can try doing a factory wipe (alt+w in the recovery menu) and retrying if all else fails.
- Download JF's US G1 Cupcake 1.51 ROM for US users or JF's UK G1 Cupcake 1.51 ROM for UK users or JF's ADP Cupcake 1.51 ROM if you have an ADP1 to /sdcard and rename it to update.zip (when you are done it should be "/sdcard/update.zip").
- To make sure the update is named correctly, in the terminal you opened earlier, type
- ls /sdcard/update*
- If you see a file named update.zip, then it is named correctly. However, if you see a file named update.zip.zip, type the following command
- mv /sdcard/update.zip.zip /sdcard/update.zip
- To make sure the update is named correctly, in the terminal you opened earlier, type
- Download the modified recovery and unzip it. Place the file "recovery_testkeys.img" in /sdcard
- In the terminal you opened earlier (with root access) Enter the following commands in to flash the modified recovery
- mount -o remount,rw /dev/block/mtdblock3 /system
- rm -f /system/recovery.img
- flash_image recovery /sdcard/recovery_testkeys.img
- Reboot your phone (completely, do not enter recovery yet or your neighbors dog might die)
- Once fully rebooted, power off your phone (hold power and select "Power Off"), and hold down home while you turn the power back on.
- When you enter the recovery console (which should say "using test keys" if your modified recovery was flashed correctly) hit "alt+L" and then "alt+S" on your keyboard. This will flash the update.zip file that you downloaded and placed there. If you have any problems with this step you missed something above.
Subscribe to:
Posts (Atom)